The Gish level editor isn't exactly easy to use, and editor.txt helps a lot, but not enough.
This is Mr. Stupid Dimwit Moron Aspiring Level Designer Idiot Tutorial. It's for people who have no idea what they're doing (hopefully they'll no longer be like that after reading this).
Before the tutorial proper, it would do well to talk about what the editor CAN'T do:
- It can't do custom objects or any sort of scripting.- It can't use cutscenes. That includes the bosses talking to Gish.
- Although it can place bosses, it can't end the level when they're killed (but they can be used as switches).
- It can't display text like the tutorial level does.
- It can't let you choose music for a level. If you don't like the five songs that get shuffled around while you're playing, you can replace the OGG files in the music directory. Just be sure to back them up first! Reinstalling isn't fun. Unless you have the Linux version (which needs no installation, you just get to extract the archive again).
With that out of the way, let's get to the tutorial itself, which will be framed by a series of inane questions from Mr. Stupid Dimwit Moron Aspiring Level Designer Idiot.
Okay, so, where is the editor anyway?
I'm glad you asked, Mr. Stupid Dimwit Moron Aspiring Level Designer Idiot. If you have a really old version of Gish, the editor will be a separate executable in the game folder (called "gished" or somesuch). If you have a really old version of Gish, you won't have an editor at all.
If your Gish is up to date, then start Gish up, and make sure that it's either A. in windowed mode or B. minimizable. That's so that you can refer to this tutorial or editor.txt. Next, click on Start, then your profile, then Custom Levels, then Level Editor.
Uhh, this doesn't look like an editor.
That's not a question. And press F1.
So...what do I do now?
Well, a good place to start would be to cobble yourself together a tileset if you plan on using a theme other than the sewer. I recommend Egypt because the blocks are nice and bright and easy to see, and are also really simple to build with.
To start making a tileset, press T. The tiles at the top are the tiles in your tileset; the tiles at the bottom are the tiles available. You can use Q and Z to scroll through your tileset, W and X to scroll through the available tiles, and [ and ] to change the tileset at the bottom. The Egypt tiles are in set 2.
You can drag and drop tiles from the bottom to the top, and also from the top to elsewhere in the top. Leave the first tile blank, and don't mess with the last five tiles (more on them later). It's advisable that you think carefully about the order you're going to put tiles in; keep similar tiles close to each other. If your tiles are in a really weird order, it will be really annoying to make a level with them. You can exit the tileset editor with ESC.
Okay, I finished my tileset! Now what?
No you didn't.
There's still one thing left to do before you can really start editing: set the properties of your tiles. Press F2; that brings up the tile editor.
You can scroll through tiles with Q and Z in the tile editor (and the main editor as well). If you hold SHIFT while doing this, it'll scroll through ten tiles at a time. Here's an explanation of the tile properties (just click on them and type a number to change them):
- Friction is, well, friction. Less than 0.1 will keep Gish from sticking to the tile; 1 is the default. Story Mode unstickable tiles use 0.01 for this. Try not to screw with friction except to make unstickable walls and ceilings; if you do screw with friction, it will confuse and annoy the player.- Breakpoint is how much force it takes for the tile to break. 0 is unbreakable, but other than that lower values are weaker.
- Middamage is the damage the tile will do to Gish if Gish touches it while it's in the midground layer (more on layers later). Story Mode spikes use 2 for this.
- Foredamage is the damage the tile will do to Gish if Gish is under it while it's in the foreground layer. Story Mode lava uses 10 for this.
- Density is the density of the tile. This is for foreground liquids (lava and water). Both use 0.8 in Story Mode.
- Drag is the drag that objects experience while under the tile. Like density, this is for foreground liquids, and both water and lava use 0.01 in Story Mode. As usual, I don't recommend you mess with either one.
- Animation is the number of tiles that this tile will animate through. The surface of lava, for example, has four frames, so you'd give the first frame an animation of 4 to animate through them (provided they're in a row).
- AnimateSpd is the speed of the animation. Lower numbers are faster, and the surfaces of lava and water both use 10 in Story Mode.
So go ahead and make your breakable and unstickable blocks (you'll find yourself wanting both in pretty much every level), and take care of your water and/or lava while you're at it.
Okay, ready for the first part you can seriously mess up? No, of course you're not, but you have to do it anyway, so suck it up. Anyway, you probably noticed that there's a green grid on every tile, and all the tiles have a blue and red box around them. That's their collision boundary, and it's what makes a wall a wall and a slope a slope. But right now, all your walls are walls and all your slopes are also walls.
The collision boundary is ostensibly simple to edit: just click and drag to draw it, and press Delete to delete lines. However, if you draw the lines in the wrong order or the wrong direction, it will really screw you up. The rule on this is to draw the lines clockwise. So go ahead and draw nice sloped collision boundaries for all your slopes, and go ahead and delete the boundaries on anything you will be placing in the midground layer but don't want to collide with the character. (There's no real need to get rid of the boundaries on background and foreground tiles.) Then you can finally leave the tile editor with ESC. There's one other feature that you don't need to concern yourself with for now: pressing A in the tile editor will delete all parts of the tile outside of the boundary lines. (This is how the slopes in the The Rapture were made.)
This sounds hard.
 Gish says that it's actually pretty easy, just a bit confusing and boring the first time. It's also faster than it sounds.
Okay, fine, I did that. Now I can finally make a level, right?
Before you do, you should save your progress! Sure, you can just load backup.lvl if you quit without saving, but that's for losers. Anyway, type a filename into the Level Name box, including the .lvl extension (you don't actually need it, but every other level has a .lvl extension, so yours should too), then press F9. That saves the level.
Then you should test out those slopes you drew earlier. They're easy to mess up, remember. Select them with Q and Z just like in the tile editor, and place them on the screen by left-clicking. Now is also a good time to mention you can delete tiles (or, more accurately, set them to tile 0 - now you see why I told you to leave it blank!) by right-clicking.
Once you've placed the slopes, press F5 to reset the level. Resetting the level should be done before you test it; if you don't reset the level, none of your changes will appear! Anyway, after you've done that, might as well save again (F9) just for the heck of it. And then you finally get to test your level with F1.
NOW can I make my level?
Yeah, sure, as long as your slopes worked. Press F1 again to get back in the editor, and get to placing tiles! Try to make things look nice; if you're confused as to how a tile should be used, look at a Story Mode level; type its filename in the Level Name box and press F7 to load it. You can do the same to get back to your own level. Be careful not to accidentally save over a Story Mode level!
There are four layers, and you switch between them with the number keys. 1 gives you the background layer, which doesn't interact with Gish but is essential in making levels look nice. 2 gives you the midground layer, which is stuff that collides with Gish (provided it has a collision boundary). 3 gives you the foreground layer, which is stuff in front of Gish; liquids must be placed in the foreground layer to do anything. 4 gives you the waybackground layer, which you can't place tiles in, but you can change its RGB values to alter the color of the background image.
What RGB values? What background image?
Every layer has its own RGB values, which alter its color and brightness. You can see them in the top right, below Gametype and Gametime. Resist the temptation to make everything bright magenta, please.
The background image is under Background, at the bottom right. Enter the name of a texture in the game's texture folder, including the .tga extension, to use that texture as the background. It won't always appear right away; you definitely need to reset the level, and you might need to actually restart the editor, possibly even the game itself. The actual background textures are cave.tga, church.tga, egypt.tga, field.tga, and sewer.tga; pick one that fits your level (field.tga is the football field, and cave.tga is used in both The Forlorn Hollow and The 7 Planes of Hehenna).
I just drew a naughty picture in my level with lava tiles. How can I erase it really fast before my mother sees it?
Hold Shift and click-drag to select an area. You can then press Delete to erase any tiles in that area in the current layer; you can also press C to copy those tiles and click to paste them. You can deselect the area by right-clicking.
So, anyway, making that level.
Go ahead and get started, but a level without objects is going to be pretty boring.
Okay, fine, tell me about objects.
Sure thing, Mr. Stupid Dimwit Moron Aspiring Level Designer Idiot.
Press F3 to bring up the object editor. You can left click to place objects, and right click to select them; the Delete key deletes the selected object. You can use the Q and Z keys to change the object you're going to place (you can't change the type of object after placing it; you have to delete and replace it). With an object selected, use [ and ] to scroll through the available textures. SHIFT works for this stuff too, by the way; you can skip through 10 textures with SHIFT+[ or SHIFT+], and 10 objects with SHIFT+Q or SHIFT+Z.
There's a list of available objects in editor.txt. I'll copy it here:
0 - Nothing.1 - Add player; use Home to select Gish and End to select Hera (player 2 in versus mode). Obviously you should only put two players in a versus level.
The following objects are moving, and can have their size changed with the cursor keys while selected (you can change other objects' sizes, but it won't do anything):
2 - A basic rectangle not attached to anything. Those little boxes and rocks you threw around in Story Mode were Object 2.
3 - A rectangle with a hinge in the middle, making it a rotating platform.
4 - A rectangle with a hinge on the left.
5 - A rectangle with a hinge on the right.
6 - A basic moving circle. These use WAY more CPU power than rectangles, so use them only when you really need to.
7 - A circle with a hinge in the middle.
8 - An anchor point. Used to attach ropes to (more on those later). Anchor points are also used as light sources (more on that later, too).
The following objects are switches, which are used to activate anchor points. Activating an anchor point will cause attached pistons to begin moving (more on pistons later). To assign a switch to an anchor point, select the anchor point, then hold K and left click on the switch. If you assign an enemy in this way, the pistons will trigger when the enemy dies.
9 - Pressure plate. This switch will only be on while it is held down. The tile occupying the same space as a pressure plate or button should always be blank (or not have a collision boundary); the tile underneath that tile, however, should be occupied by a full collision boundary.
10 - One-time button. When pressed down, it will turn on and stay on.
11-14 - Switches that can be turned on and off by flipping the lever back and forth. These can be kind of frustrating to the player if they are placed badly.
15 - An area switch. Turns on when the player enters its area, and off when they leave it.
16 - A one-time area switch; turns on when the player enters its area and stays on even after they leave it.
17 - An object generator; it creates other objects. These should be used very sparingly.
18 - A secret area marker. When Gish touches this, he'll speak appropriately, and also advance the "Secrets Found" counter.
19 - Nothing.
The following objects are enemies. Changing their mass, friction, and size won't do anything. Don't put too many enemies in your levels, as they get rather boring.
20 - Bone nibbler (Egypt)
21 - Cave nibbler
22 - Hell nibbler
23 - Mummy
24 - Skeleton
25 - Zombie (Sewer)
26 - Gimp (Hell)
27 - Vis sister (Hell boss)
28 - Angel nibbler
29 - Alterboy (yeah, it's misspelled)
30 - Stitch (Cave)
31 - Poobler (Sewer nibbler)
32 - Honey bucket (Sewer boss)
33 - Sister Vis (Church boss)
34 - Paunchy Chops (Cave boss)
35 - Basinjin (Egypt boss)
36 - Satan (secret "boss," he's basically a nibbler)
Every object has properties; these are simpler than tile properties. Mass and Friction are what you'd expect. LType is the light type; 1 is a normal light, 3 is a flickering light, everything else is no light. Don't use lights on things that aren't anchor points unless you have a good reason to, as moving lights are very resource heavy and often look bad. For an example of a moving light source used well, look at level 2-7 in Story Mode.
Red, Green, and Blue are the color values for a light. Intensity is the intensity of the light. On anchor points, Red, Green, and Blue are also used to determine the properties of attached pistons (more on pistons later).
Remember, you need to reset the level for your changes to take effect! And remember to save, too.
This sounds REALLY hard.
 Paunchy Chops agrees that objects can be a pain, but he thinks they're really worth it! Remember, you don't have to memorize that list. Just refer back to it.
Hey, what about collectibles? I don't see them in there.
Remember back when I told you to leave the last five tiles of your tileset alone? Go select one of those tiles. Yup, you've got all three ambers, the tar balls, and the extra lives in there.
Where are the ropes? They aren't in that object list either.
Press F4 to open the rope editor. You can connect any two movable objects and/or anchor points with ropes. To place a rope, hold the corresponding number key while clicking on the green plus signs.
Available ropes are:1 - Weak rope
2 - Strong rope
3 - Weak chain (chains are much stronger than ropes)
4 - Strong chain
5 - Pushing piston
6 - Half-pushed pushing piston
7 - Pulling piston
8 - Half-pulled pulling piston
9 - Bar
Ropes and chains need little explanation. Bars are basically stiff, indestructible ropes, generally used to hold several moving objects together. Pistons are a bit complicated; a piston must be attached to an anchor point and a moving object to do anything useful at all, AND you must click on the anchor point's plus sign first and the moving object's plus sign second.
Then you have the piston's properties to worry about; you change these by changing the Red, Green, and Blue values of the anchor point. Red is the number of tiles that the piston will move, Green is the time it will take for it to move this distance twice (one full "cycle"), and Blue is how many "cycles" it will make (0 is infinite cycles).
If no switch is assigned to an anchor point (remember the Objects section?), the piston will begin moving immediately; otherwise it will wait for the switch to be triggered. If a switch is switched from on to off, the piston will stop if it was an actual switch (objects 11-14); if a pressure plate has the pressure lifted off of it, it has the same effect as pressing it down, i.e. the piston does the number of cycles specified in Blue.
How about an example? You want to make a door that opens and closes. So you add object 2, which is your closed door; you increase its size so that it's one tile bigger than the passage it's closing off (the extra tile is in the ceiling, and it keeps Gish from simply knocking the door away). You give it a good deal of mass so that Gish can't force it into the ceiling (hint: stuff going through walls is bad). Then you add an anchor point above it and attach two pulling pistons from the anchor point to the door's two top corners.
It should look something like this:
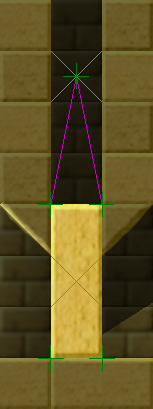
Now you add a pressure plate somewhere, then you go back to your anchor point, select it, hold K and left click on the pressure plate. At this point you almost have a door; you just need to adjust the door's properties. Set Red to the height of the passage (2 in this case), Green to 1 (it's a fast door), and Blue to 0.5 (you always use 0.5 for doors). Done! Just remember to reset the level before you test it.
This sounds extremely complicated and completely outside of my abilities.
 Basinjin thinks it's impossible. But he's kind of a moron. Anyway, why not just skip the pistons for now? Come back later when you feel more confident. Maybe even play a different game for a while.
Never mind, I think I can figure it out. Anyway, I can't figure out how to end the level.
Don't give up, Mr. Stupid Dimwit Moron Aspiring Level Designer Idiot. Anyway, select an area like you did before (SHIFT+click and drag), then press 5 to set that area as the level's exit.
You mentioned Gametype and Gametime. What are those?
They're pretty easy. Gametype is the type of level; 0 for a normal level, 1 for a one-player collection level, 10 for a football level, 11 for a sumo level, 12 for an amber (greed) level, 13 for a pitfight level, 14 for a dragster level, and 15 for a two-player collection level.
Gametime is the time limit for a collection mode level, in fiftieths of a second, so 3000 is one minute.
I don't know how to make a [bridge/cart/pulley/moving platform].
Look in a level which contains the object you're trying to make; that's by far the easiest way to learn how to make something. If you still can't figure it out after that, ask for help on the Gish forums.
How do I use custom textures?
Just shove them into a tileset folder, numbered appropriately and in TGA format. Textures are stored in the level file itself, so other people do NOT need to have the textures to play the level.
How do I get a custom texture out of a level?
There's no easy way to do this. You could figure out the level format and extract it from that, you could save the level under a different name and build your level from that (if you wanted textures from two different levels, tough luck), you could take a screenshot and pull the tile out, or you could ask whoever made the level to give you the texture. Note that many "custom" textures are actually just regular textures which have been chopped up in the tile editor; you may recall I gave an example of this, and you may recall that said example was the slopes in The Rapture.
I hear Gish is open source now. Will people make the editor better?
Maybe they will and maybe they won't. Keep in mind that while the game is open-source, the assets (graphics, sound, levels) are not, which means no free copies of the game, which means there hasn't been and won't be a sudden surge of interest as with a lot of games that go open-source. Of course, Cryptic Sea could release the assets in the future - who knows?